• Welcome! The TrekBBS is the number one place to chat about Star Trek with like-minded fans.
    If you are not already a member then please register an account and join in the discussion!

1/350 TOS ENTERPRISE

I'm trying to decide if I want to keep the grid lines or not. I've always like the idea of them, even if their implementation has always been flawed. Given that it has windows on the port side and other details missing from the original studio model, I'm happy with the idea that this is an interpretation of the Enterprise and not necessarily a perfect replica of one of the shooting models.

If I do keep the lines, at the very least I'll remove them where they trace over the triangular hatches on the underside and the rectangular patches over engineering. I also think the space around the ventral dome should be free of radial lines up to the first circular grid.

I'm also thinking of shifting the turbolift so that it lines up with the Bridge interior detail.
 
I'm trying to decide if I want to keep the grid lines or not. I've always like the idea of them, even if their implementation has always been flawed. Given that it has windows on the port side and other details missing from the original studio model, I'm happy with the idea that this is an interpretation of the Enterprise and not necessarily a perfect replica of one of the shooting models.

This is exactly the philosophy expressed by the Round 2 production staff in their email updates and discussions at hobbyTalk. :)

If I do keep the lines, at the very least I'll remove them where they trace over the triangular hatches on the underside and the rectangular patches over engineering. I also think the space around the ventral dome should be free of radial lines up to the first circular grid.

For the record, Gary Kerr (the kit's designer and researcher) said the full-sized filming model had the grid lines drawn right over those panels.

I'm also thinking of shifting the turbolift so that it lines up with the Bridge interior detail.

Anarchist! ;)
 
I got off my lazy rump and took a couple pictures:


Here's a comparison of three different saucers:
threesaucers.jpg


The top is the Polar Lights 1:1000 scale kit. Beneath that is an AMT model I stopped work on 15 years ago -- I found tools I'd lost in that box! Underneath all that is the 1:350 scale saucer.

Now, wouldn't it be a hoot to actually build one that way? With the little 1/537 or whatever bridge atop that huge 1/350 saucer?

I've often wondered about layering saucers from smallest offerening to biggest, only slicing and dicing a bit as the B/C decks get layered atop each other separately, then atop inlaid saucers.

I'd like to see a drawing of what that might look like, just for fun. I just wish Kerr's blueprints had been part of the kit.
 
I just slid mine together with rubber bands and tape, and the sucker is SOLID! Thick, heavy plastic; deep, firm tab-in-slot connections. She'll never sag.
 
Ah, good! I was beginning to wonder if I should rig up a brass armature for the secondary hull to nacelles.

What do you make of those plastic tabs along the edge of nacelle part 35 (the inside half of the nacelle)? I want to cut them off, but they almost look like intentional spacers.

[furrows brow]

Maybe I should read the instructions.
 
I got off my lazy rump and took a couple pictures:


Here's a comparison of three different saucers:
threesaucers.jpg


The top is the Polar Lights 1:1000 scale kit. Beneath that is an AMT model I stopped work on 15 years ago -- I found tools I'd lost in that box! Underneath all that is the 1:350 scale saucer.

Now, wouldn't it be a hoot to actually build one that way? With the little 1/537 or whatever bridge atop that huge 1/350 saucer?

I've often wondered about layering saucers from smallest offerening to biggest, only slicing and dicing a bit as the B/C decks get layered atop each other separately, then atop inlaid saucers.

I'd like to see a drawing of what that might look like, just for fun. I just wish Kerr's blueprints had been part of the kit.

Well that's the poor man's scale up version of new trek Enterprise. :lol:

I just slid mine together with rubber bands and tape, and the sucker is SOLID! Thick, heavy plastic; deep, firm tab-in-slot connections. She'll never sag.

And not one picture, eh? You are mean, man. Just mean... ;)

Ah, good! I was beginning to wonder if I should rig up a brass armature for the secondary hull to nacelles.

What do you make of those plastic tabs along the edge of nacelle part 35 (the inside half of the nacelle)? I want to cut them off, but they almost look like intentional spacers.

[furrows brow]

Maybe I should read the instructions.

Pff- instructions are for suckers.


And those who want it done right.
 
Hey ... give me a break! I'm way out of practice and stuff. :)

Has anyone received their photoetched brass parts yet? If so, how was it shipped?
 
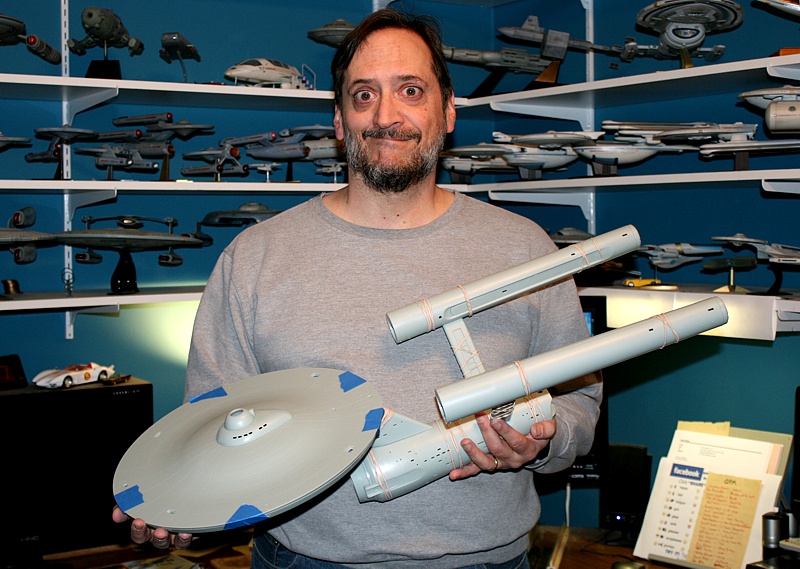
Alright, since Forbin's such a tease, I couldn't resist doing a partial throw-together. I can confirm his report; it's amazing how well this thing holds together with nothing more than a few pieces of masking tape. Round 2 definitely learned from years of AMT trial and error.

Here's a shot of the ship resting in my office chair. Don't mind the little Johnny Lightning Enterprise ... he's an unrepentant photo-bomber!
1701tapedtogetherupright.jpg


Watch the gaps! Here's a slightly more Trekkish view of the model. As you can see, I'm holding this together with just five pieces of tape; one on the secondary hull, and two on each nacelle.
1701tapedtogetherbehind.jpg


I've begun working out lighting plans. I intend to use an Arduino to control all lighting effects. I'd hoped to use a couple of Pico projectors to project CGI animation effects onto the interior of the nacelle domes, but I'm getting discouraged by the tight fit and the availability of parts for the projector.
 
Aren't the manufacturers making a separate lighting kit for this beast? What are the details on that?

--Alex
 
Aren't the manufacturers making a separate lighting kit for this beast? What are the details on that?

--Alex

Sure they are ... and it's not a bad kit. But I have certain specific requirements and one is I don't want the distracting noises of moving parts when the nacelles are lit up. Additionally, I plan to customize the lighting with subtle effects behind the intercoolers, place additional running lights on the nacelles, and wirelessly allow the model to display certain effects so I can know, at a glance, that I have e-mail waiting because the windows are flashing. Or that the sump pump has failed because the nacelles are the wrong color. This will require an on-board computer that can be programmed with these considerations in mind.

The nacelle domes are particularly important to me. Not only do I want them silent and without any moving parts, but I also wish to "enhance" the spinning fan effect with roiling plasma. My idea was to use micro projectors behind each dome, focused through fish-eye lenses to project pre-warped animations on the inner surface of the domes.

I'm running into trouble getting the parts I need. 3M, for example, doesn't appear to have actually put their smallest micro projectors into production since the original demand (to give smartphones the ability to present on a bigger screen) has been supplanted by devices with ... bigger screens -- tablets and such. A children's toy, the Eyeclops Mini Projector, came in at the perfect price two years ago ($29.95), but these days is harder to come by, more expensive, and will require some re-engineering of the display components to fit in the nacelles.
 
Micro projectors?

That's got to be the most novel approach for the nacelle dome effect I've ever read!

What inspired you to think of that?

Sincerely,

Bill
 
bigeassy.jpg


That's just taped and banded together. The tab-in-slot joins on the neck and pylons are so deep and firm that this thing is rock solid just slid together!
 
^ Gasp... Forbin... actually going ... to build a kit ... as it was intended...

*faints*

Looks like your going with 1st. pilot version? Still haven't open my kit yet. I think I'm going to wait for the light kit to become available. Still seems to be out of stock; probably need another month or two to fill the pipeline. If memory serves, were we not supposed to get the photo-etched parts with the Premier Kit? Nothing on the box indicates it was in the package too. Sending separately? Anyone know?

Q2UnME
 
2nd pilot. I like the rocket exhausts. :)
And unlit. I'm calling this one practice.
Then a fully lit production version for over my TV.

THEN maybe the bashing shall begin.
 
I'm one of the 1701 Club members and my order was #1127. It's on its way and I can't wait. I plan on building an idealized Pike era version.
 
Anyone on this form started to build theirs yet? Anyone going to do a WIP thread?

As an aside, I received an e-mail almost a week ago now that stated additional Premier kits were still available for purchase (1st. come, 1st. served basis). Checked on Saturday and I could have gotten another, but my bank account balance forced me to pass. Anyone gotten a couple?

Q2UnME
 
Anyone willing to do a "Work In Progress" Thread? Anyone? Forbin? Psion? Warped9?

Bueller? ..... Bueller? ......

Someone has to be working on theirs already.....

Q2
 
Last edited:
If you are not already a member then please register an account and join in the discussion!

Sign up / Register


Back
Top